Tools
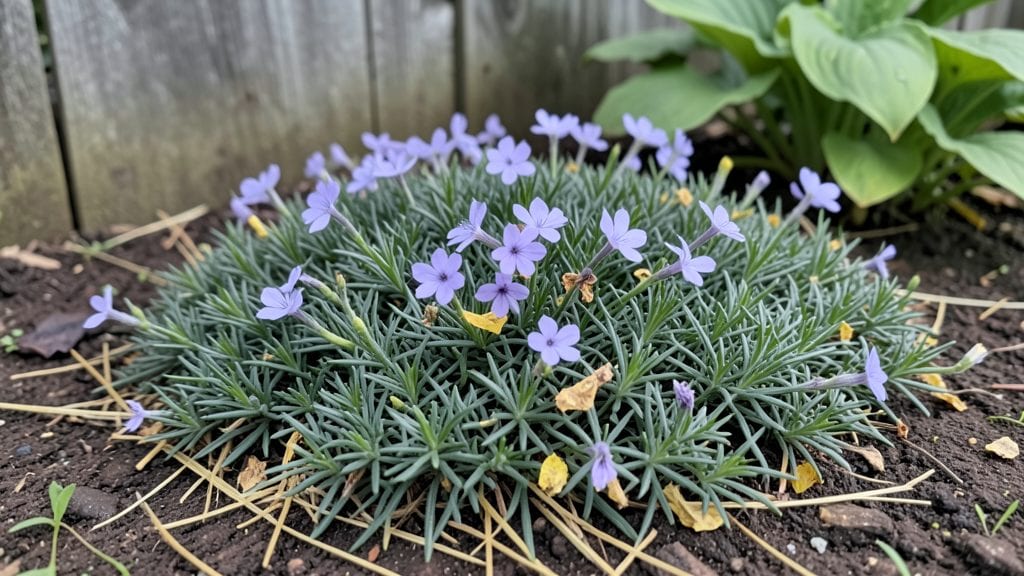
Dwarf garden phlox delivers neighborhood-stopping blooms in a footprint smaller than your hand. 🌸 After struggling with floppy, flop-prone varieties, I finally found the perfect compact phlox that thrives in my 6-inch-wide window boxes—and it’s the secret weapon for small-space gardeners everywhere.
The trick is matching their needs: 6 hours of morning sun, well-draining soil with a sprinkle of compost, and water that keeps the roots moist but never soggy.
Most people overwater, which leads to those dreaded mildew spots—so aim for 1 inch per week and let the soil dry slightly between waterings. Once established, these tough little plants bounce back from neglect, making them ideal for busy gardeners.
By midsummer, you’ll be surrounded by clusters of fragrant lavender, pink, or white blooms that attract butterflies while keeping your space lush and colorful. The secret to long-lasting flowers?
A light pruning after the first flush of blooms fades—just snip back by a third to encourage a second round of vibrant growth.
Perfect for borders, containers, or even hanging baskets, dwarf phlox adapts to almost any sunny spot. Whether you’re filling gaps in a cottage garden or adding height to a patio planter, these compact bloomers deliver maximum impact with minimal space. Let’s get yours thriving!
📚 In This Guide
- What you need
- Instructions
- Tips and common mistakes
- Wrapping up and next steps
What you need
- ● Dwarf garden phlox plants: 3–5 plants (choose varieties like ‘Starfire’ or ‘Nanus’ for compact growth, 6–12 inches tall).
- ● Well-draining potting mix: 1–2 bags (look for a blend with perlite or vermiculite for aeration).
- ● Containers or garden bed: Containers: 6–12-inch pots with drainage holes (1–2 per plant).
- ● Garden bed: Partial shade with moist, fertile soil (amend with compost if needed).
- ● Slow-release fertilizer: 1–2 tablespoons per plant (balanced 10-10-10 or organic options like bone meal).
- ● Mulch: 1–2 inches of organic mulch (e.g., shredded bark or straw) to retain moisture.
- ● Hand trowel or small spade: For planting and soil prep.
- ● Watering can or hose with a gentle spray nozzle: Dwarf phlox prefers consistent moisture.
- ● Pruning shears: To deadhead spent blooms and shape plants.
- ● Garden gloves: For protection while handling soil or plants.
- ○ Stakes or cages (optional): If your phlox variety leans heavily, lightweight supports help.
- ○ Liquid fertilizer (optional): For mid-season feeding (diluted according to package instructions).
Step-by-step instructions for planting and cultivating dwarf garden phlox
Here's how to coax vibrant, compact blooms from dwarf phlox—perfect for borders, containers, or cottage gardens.
🌱 Step 1: Select and Prepare the Planting Site
Dwarf garden phlox thrives in full sun to partial shade, so choose a spot with at least 4-6 hours of direct sunlight daily. I prefer a location with morning sun and afternoon shade to prevent afternoon wilting, especially in hotter climates. The soil should drain well but retain moisture—amend heavy clay with 2-3 inches of compost to improve aeration and fertility.
Loosen the soil to a depth of 12 inches using a garden fork, breaking up any compacted layers. Phlox roots spread horizontally, so space plants 12-18 inches apart to allow for bushy growth without overcrowding. If planting in containers, ensure pots are at least 10 inches deep with drainage holes to prevent root rot.
💧 Step 2: Plant and Establish the Roots
Dig a hole slightly wider than the root ball but no deeper—phlox roots should sit at the same level as they were in the nursery pot. Gently remove the plant from its container and tease apart any circling roots to encourage outward growth. Place the phlox in the hole, backfilling with soil while pressing lightly to eliminate air pockets.
Water deeply immediately after planting to settle the soil and encourage root contact. You’ll know it’s right when the soil surface looks slightly firm but not compacted. Mulch around the base with 1-2 inches of organic mulch (like shredded bark) to retain moisture and suppress weeds. Avoid piling mulch against the stems—keep it 2 inches away to prevent rot.
☀️ Step 3: Maintain Moisture and Fertility
Dwarf phlox loves consistent moisture but hates soggy roots. Water 1-2 times per week, depending on rainfall, until the soil feels 2-3 inches deep and slightly dry to the touch. Deep watering encourages stronger root systems. In hot weather, you may need to water more frequently—watch for wilting leaves as a signal to hydrate.
Feed lightly with a balanced, water-soluble fertilizer (10-10-10) at planting and again in early summer. Too much fertilizer leads to lush foliage but fewer blooms, so dilute to half-strength. I also top-dress with 1 inch of compost in spring to provide slow-release nutrients without overstimulating growth.
✂️ Step 4: Prune for Longer Blooms and Healthy Growth
Deadhead spent blooms regularly to encourage continuous flowering. Pinch off faded flowers just above a set of leaves or a new bud—this redirects energy from seed production back into new blooms. I do this every 2-3 days during peak bloom to keep the plant looking tidy and productive.
After the first flush of flowers fades, cut back the stems by one-third to promote a second round of blooms. Avoid heavy pruning after mid-summer, as phlox needs time to harden off before winter. In fall, trim back any dead or diseased stems but leave the healthy foliage until it dies back naturally—this protects the crown from winter cold.
⏰ Step 5: Overwinter and Prepare for Next Season
Dwarf phlox is hardy in zones 3-8, but a thick layer of mulch (up to 4 inches) helps insulate the roots during winter. I use shredded leaves or straw, pulling it back in early spring once new growth appears. Avoid disturbing the plant until late winter, when you’ll notice fresh shoots emerging.
In early spring, remove any dead mulch and add fresh compost around the base. Prune back any winter-damaged stems and fertilize lightly to kickstart new growth. You’ll see buds forming in 4-6 weeks, signaling it’s time to step up watering and deadheading for another stunning season.
Tips & tricks for perfect dwarf garden phlox care
These insider tricks will help you coax the most vibrant blooms from your dwarf phlox—without the common pitfalls that stifle growth.
Soil Preparation Secret: Before planting, I always mix in 2-3 inches of compost right into the bottom of the planting hole—this creates a nutrient-rich zone where roots can establish quickly. For containers, use a high-quality potting mix with perlite to ensure proper drainage. The key is mimicking phlox's natural preference for well-draining yet moisture-retentive soil.
Root Establishment Trick: When planting, gently tease apart any circling roots you find at the bottom of the root ball. This encourages outward growth rather than a tangled mass. I also press down firmly around the edges of the hole after planting to eliminate air pockets—this ensures immediate root contact with moist soil. The first deep watering should settle everything perfectly.
Watering Wisdom: The 1-2 times per week guideline works for average conditions, but I've learned to adjust based on leaf texture. In hot weather, water when the top 2-3 inches of soil feel dry to the touch—this prevents both underwatering and root rot. Early morning watering minimizes evaporation and fungal risks. A soaker hose placed at the base works wonders for consistent moisture without wetting the foliage.
Pruning Precision: When deadheading every 2-3 days during peak bloom, I use clean pruners and cut just above a set of leaves or new bud. This redirecting of energy creates that second flush of blooms we all love. For the one-third pruning after the first flush, I always use sharp shears to avoid tearing stems, which can invite disease. Timing is everything—never prune after mid-summer when the plant needs to harden off.
Pro Tips for Dwarf Garden Phlox
- These insider tricks will help you coax the most vibrant blooms from your dwarf phlox—without the common pitfalls that stifle growth.
- Soil Preparation Secret: Before planting, I always mix in 2-3 inches of compost right into the bottom of the planting hole—this creates a nutrient-rich zone where roots can establish quickly.
- Root Establishment Trick: When planting, gently tease apart any circling roots you find at the bottom of the root ball.
Frequently asked questions
Got questions about growing dwarf garden phlox? You’re not alone! Here are some of the most common concerns—plus quick answers to help you cultivate happy, blooming plants with ease.
How do I keep my dwarf garden phlox compact and bushy?
Pinch back the tips of new growth in early spring (or when plants are about 6 inches tall) to encourage branching. Deadhead spent blooms regularly to redirect energy into more flowers instead of seed production. Pro tip: A light fertilizer with slow-release granules in spring will also promote dense, compact growth!
When is the best time to plant dwarf garden phlox?
Plant in early spring (after the last frost) or early fall (4–6 weeks before the first frost). This gives roots time to establish before extreme heat or cold. If planting in containers, wait until nighttime temps stay above 50°F to avoid transplant shock. Bonus: Fall planting often leads to earlier blooms the following year!
What pests or diseases should I watch for?
Dwarf phlox can attract aphids, spider mites, and slugs. Treat aphids with a strong spray of water or insecticidal soap. For slugs, use beer traps or diatomaceous earth. Powdery mildew is the biggest disease risk—improve airflow, avoid overhead watering, and apply fungicide if needed. Prevention tip: Choose varieties like ‘Fire Spinner’ or ‘David’ for better disease resistance!
Can I grow dwarf garden phlox in containers?
Use 5–7 inch pots with well-draining soil and a mix of compost for nutrients. Ensure containers have drainage holes and place them in full sun to partial shade. Water consistently (but avoid soggy soil) and fertilize lightly every 4–6 weeks. Container hack: Pair with trailing plants like Lobelia for a stunning combo!
How do I overwinter dwarf garden phlox in cold climates?
Mulch plants with 2–3 inches of shredded leaves or straw after the ground freezes but before heavy snow. In zones 4–5, cut back foliage to 2 inches in late fall. For containers, move pots to an unheated garage or wrap them in burlap. Cold-weather tip: Avoid mulching too early—wait until temps drop below freezing to prevent rot!
Wrapping up and next steps
Dwarf garden phlox is a delightful addition to any small garden, offering vibrant blooms with minimal space requirements. With the right soil, sunlight, and care, these compact beauties will reward you with months of color—perfect for borders, containers, or pollinator-friendly gardens. 🌸
Ready to transform your space? Start by selecting your favorite varieties, then plant with confidence! Whether you’re a beginner or a seasoned gardener, these hardy flowers make growing easy and rewarding. Grab your gloves, and let’s get those blooms thriving! 🌱