Tools
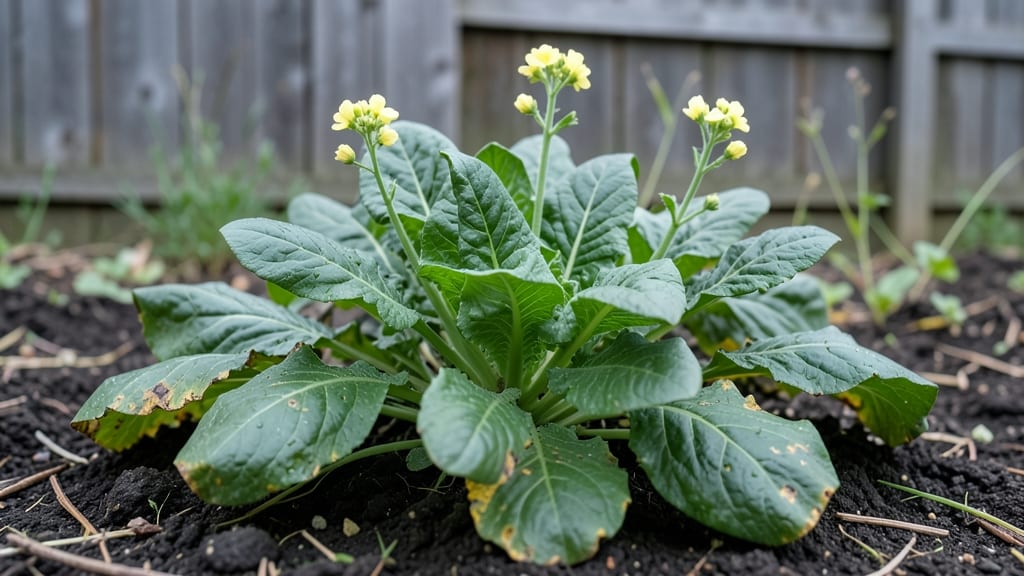
Growing mustard greens in your garden delivers sharp, peppery greens that outperform store-bought any day. 🌱 I’ve grown them for three winters now, and the secret is treating them like fast-growing salad greens—not vegetables.
They bolt in heat but thrive in cool weather, giving you harvests from early spring through fall.
The setup couldn’t be simpler: a sunny spot, loose soil, and consistent moisture.
Mustard greens grow best in well-draining soil with a pH of 6.0–7.0, and they’ll bolt if temperatures climb above 75°F. Varieties like ‘Southern Giant Curled’ or ‘Tendergreen’ handle heat better than others, but even those prefer cooler days.
Plant seeds ½ inch deep, 1 inch apart, and keep them moist until they sprout in about a week.
You’ll start harvesting in just 3–4 weeks when leaves are 4–6 inches tall. Snip the outer leaves to encourage regrowth, and you’ll get multiple cuts per planting. The flavor gets spicier as they mature, so pick young for mild greens or let them grow for a peppery kick.
Pests like flea beetles are the main threat, but a row cover or neem oil spray keeps them in check.
This method works in containers too—just use a 5-gallon pot for a steady supply. Mustard greens are the ultimate low-maintenance crop, perfect for beginners or busy gardeners. Once you try them, you’ll never buy bagged greens again.
📚 In This Guide
- What you need
- Instructions
- Tips and common mistakes
- Wrapping up and next steps
What you need
- ● Seeds: Fast-maturing mustard green seeds (e.g., 'Southern Giant Curled,' 'Tendergreen,' or 'Red Giant'). Aim for 1-2 oz (30-60g) to cover a 10x10 ft area.
- ● Growing Space: Full sun to partial shade (4-6 hours of sunlight daily).
- ● Well-draining soil (pH 6.0-7.0).
- ● Raised beds, containers (at least 6 inches deep), or in-ground plots.
- ● Soil Amendments: Compost or aged manure (2-3 gallons per 10 sq ft).
- ● Balanced fertilizer (10-10-10 or organic option, 1 tbsp per plant).
- ● Watering Supplies: Garden hose with a gentle spray nozzle or drip irrigation system.
- ● Planting Tools: Garden trowel or transplanter.
- ● Row marker or string (for spacing).
- ● Row Cover: Frost cloth or lightweight fabric to extend the growing season.
- ● Mulch: Straw or shredded leaves to retain moisture and suppress weeds.
- ● Organic Pest Control: Neem oil or insecticidal soap for aphids or flea beetles.
- ● Harvesting Tools: Sharp scissors or pruning shears for clean cuts.
- ● Garden Journal: To track planting dates, soil conditions, and harvest times!
Step-by-Step instructions for planting a mustard greens garden
Here's how to grow bold, peppery mustard greens that keep producing through cool seasons.
🌱 Step 1: Prepare the Soil for Fast Germination
Mustard greens thrive in loose, nutrient-rich soil that drains well. Work the soil to a depth of 12 inches using a garden fork or tiller. Remove any rocks or debris that could hinder root growth. I like to mix in a 2-inch layer of compost directly into the top 6 inches of soil—this gives the greens the phosphorus boost they need for rapid leaf production.
Test the soil pH before planting. Mustard greens prefer a slightly acidic to neutral range of 6.0-7.0. If your soil tests higher, add sulfur to lower the pH gradually over a few weeks. The goal is soil that feels light and crumbly when you squeeze a handful—like damp sandpaper. This texture prevents the roots from becoming waterlogged, which is their biggest enemy.
💧 Step 2: Sow Seeds at the Right Depth and Spacing
Scatter mustard green seeds ¼ inch deep in rows spaced 12-18 inches apart. I use my finger to create shallow furrows first—this keeps seeds evenly spaced and prevents overcrowding. Plant seeds ½ inch apart within each row, but don't worry about perfect spacing; you can thin them later. The key is to avoid planting too densely, which leads to weak, leggy plants.
Cover the seeds lightly with soil and pat down gently to ensure good seed-to-soil contact. Water immediately with a fine mist or gentle stream from a watering can. You'll know you've done it right when the soil surface looks uniformly moist but not saturated. Keep the soil consistently damp—never soggy—until germination, which typically occurs in 5-10 days when temperatures are between 50-70°F.
☀️ Step 3: Provide Cool-Season Light and Water
Mustard greens love cool weather and partial shade during the hottest part of summer. Plant them where they receive 3-5 hours of morning sun and afternoon shade, especially in warmer climates. If growing in full sun, water deeply twice daily during heatwaves to prevent bolting—the sudden flowering that turns your greens bitter.
Watch for signs of stress: wilting leaves or yellowing edges mean it's time to adjust. Mulch with 2-3 inches of straw or shredded leaves to retain moisture and keep roots cool. I like to water in the early morning so the leaves dry quickly, reducing the risk of fungal diseases like downy mildew. Harvest outer leaves when they reach 4-6 inches tall to encourage continuous production.
✂️ Step 4: Harvest and Maintain for Continuous Yields
Mustard greens are cut-and-come-again champions. Use clean scissors or a sharp knife to snip the outer leaves 1-2 inches above the soil line. This encourages the plant to send up new growth from the base. I harvest every 2-3 weeks during active growth, but you can pick more frequently in cooler weather when growth accelerates.
Fertilize lightly every 4-6 weeks with a balanced organic fertilizer (like 5-5-5) to replenish nutrients. Avoid over-fertilizing—mustard greens are fast growers and don't need heavy feeding. If you notice leaves turning yellow between the veins, that's a sign of nitrogen deficiency. Add a handful of compost to the soil around the plants and water deeply to correct it.
Tips & tricks for perfect mustard greens garden
These game-changing insights will help you grow peppery, productive mustard greens with minimal effort—and avoid the common pitfalls that turn new gardeners away!
Soil Prep Secret: In Step 1, don't just work the soil—think about its texture. Mustard greens hate soggy roots, so if your soil feels heavy when squeezed, mix in an extra 1-inch layer of compost to improve drainage. I've seen plants bolt prematurely when roots suffocate in compacted soil. Test your soil's moisture retention by squeezing a handful—it should crumble like damp sandpaper, not stick together. This simple check prevents the #1 reason mustard greens fail!
Germination Hack: The 5-10 day germination window in Step 2 can feel like forever, but you can speed things up! After sowing, cover the seed bed with a thin layer of clear plastic wrap (just remove it once sprouts appear). This creates a mini greenhouse effect that maintains consistent moisture and warmth at 70°F—perfect for germination. I've cut my wait time nearly in half using this trick, and it prevents seeds from drying out if you get distracted or forget to water!
Harvesting Strategy: When you're ready to harvest in Step 4, focus on the outer leaves first—they're more mature and won't stunt the plant's growth. Use clean scissors and cut at a 45-degree angle just above where new leaves are forming. This angled cut prevents water from pooling on the stem, which reduces disease risk. I harvest every 2-3 weeks during warm weather, but in cooler months, I can pick more frequently because the plants grow faster. The key is to never take more than ⅓ of the plant at once!
Pest Prevention: Mustard greens attract pests like cabbage worms and aphids, but there's a simple organic solution. In Step 3, when you're mulching, sprinkle a thin layer of diatomaceous earth around the base of your plants (just avoid direct contact with leaves). This natural powder dehydrates soft-bodied pests without harming your greens. I've used this trick for years—it's my secret weapon against pests without resorting to chemicals. Plus, it breaks down naturally in the soil!
Pro Tips for Mustard Greens Garden
- These game-changing insights will help you grow peppery, productive mustard greens with minimal effort—and avoid the common pitfalls that turn new gardeners away!
- Soil Prep Secret: In Step 1, don't just work the soil—think about its texture.
- Germination Hack: The 5-10 day germination window in Step 2 can feel like forever, but you can speed things up!
Frequently asked questions
Got questions about growing mustard greens in your garden? You’re not alone! Here are some of the most common queries—plus straightforward answers to help you cultivate a thriving, low-maintenance patch of these nutrient-packed greens.
How long does it take for mustard greens to grow?
Mustard greens are fast growers—typically ready to harvest in 30 to 45 days from seed! For baby greens, you can snip leaves in as little as 3 weeks. If you’re growing for full maturity (bolting), expect 50 to 60 days. Success tip: Thin seedlings to 4–6 inches apart to avoid overcrowding and speed up growth.
Can I grow mustard greens in containers or small spaces?
Mustard greens thrive in containers, raised beds, or even window boxes as long as they get 6+ hours of sunlight daily. A 5-gallon pot or larger works for a small harvest, and they don’t need deep soil—6–8 inches is perfect. Just ensure good drainage to prevent root rot. Pro tip: Use a lightweight potting mix with compost for best results!
Why are my mustard greens turning bitter or bolting early?
Bitter flavor or early bolting (flowering) usually happens due to heat stress, long daylight, or maturity. To prevent it:
- Harvest young: Pick leaves before plants reach 12 inches tall.
- Choose heat-tolerant varieties: Look for ‘Southern Giant Curled’ or ‘Tendergreen’—they handle warmth better.
- Avoid overcrowding: Space plants 6–12 inches apart for airflow.
- Use shade cloth: In hot climates, provide afternoon shade to delay bolting.
Bonus: Cooking bitter greens with vinegar or citrus can mellow their flavor!
What’s the best way to harvest mustard greens without killing the plant?
Mustard greens are cut-and-come-again crops—here’s how to do it right:
- Harvest outer leaves first: Snip individual leaves or cut stems at the base, leaving the center intact.
- Avoid taking more than ⅓ at once: This encourages regrowth.
- Use clean scissors or shears: A sharp cut prevents damage.
- Water well after harvesting: Keeps the plant hydrated for faster regrowth.
With proper care, you can enjoy multiple harvests per season!
Are mustard greens hard to grow from seed, or should I buy starts?
Mustard greens are easy from seed—no need for starts unless you’re short on time! Direct-sow seeds ¼-inch deep in well-drained soil, keeping them moist until germination (usually 5–10 days). Starts can be pricier and may not be as cold-hardy. Save money and effort: Start seeds indoors 4–6 weeks before your last frost for an early jumpstart!
What pests or diseases should I watch for with mustard greens?
Mustard greens are generally pest-resistant, but keep an eye out for:
- Flea beetles: Tiny holes in leaves? Handpick them or use row covers.
- Aphids: Spray with water or introduce ladybugs for natural control.
- Downy mildew: Caused by humidity—improve airflow and avoid overhead watering.
- Cabbage worms: Remove manually or use Bt (Bacillus thuringiensis) spray.
Prevention tip: Rotate crops yearly and mulch to deter soil-borne issues.
Wrapping up and next steps
Growing mustard greens in your garden is a rewarding way to enjoy fresh, nutrient-packed greens with minimal fuss! Whether you’re a seasoned gardener or just starting out, these hardy plants thrive in cool weather and adapt to small spaces—making them perfect for year-round harvests.
With the right soil, sunlight, and a little care, you’ll be feasting on homegrown greens in no time.
Ready to take the next step? Start small—plant a few seeds or seedlings this week! Experiment with varieties, share your progress, and soon you’ll be the proud host of a thriving mustard greens garden. Happy growing! 🌱✨