Tools
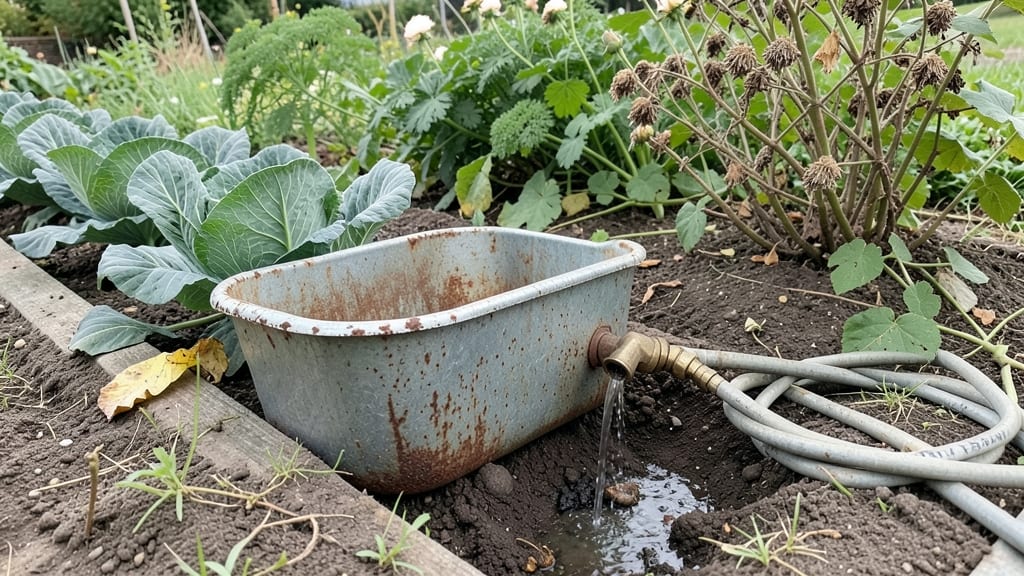
This garden sink DIY project turned my old kitchen sink into a self-watering planter and tool wash station—one of the smartest upgrades I’ve ever done. ✨
The beauty of this project lies in its simplicity—no plumbing skills required. You'll need a sturdy container, a drain assembly, some gravel for drainage, and your choice of potting mix. Most garden centers carry all the hardware you'll need, and the whole thing fits together in under two hours.
My setup holds herbs, lettuce, and even small peppers while keeping the water clean and accessible.
Picture this: fresh basil within arm's reach while you wash your hands after harvesting. The built-in drainage prevents soggy roots, and the sink shape makes it perfect for growing shallow-rooted plants. Plus, the aesthetic? Rustic charm meets functional gardening—neighbors will ask how you did it.
Works equally well in raised beds, patio corners, or even as a standalone feature. Whether you're dealing with a small balcony or a sprawling backyard, this planter adapts to any space while cutting down on water waste. Let's get started turning that sink into a garden gem.
📚 In This Guide
- What you need
- Instructions
- Tips and common mistakes
- Wrapping up and next steps
What you need
- ● 1x Upcycled sink (fireclay, porcelain, or stainless steel—avoid fiberglass if possible). Size: 12”–18” diameter for small gardens, 20”+ for larger spaces.
- ● 1x Waterproof liner (EPDM rubber sheeting, 4’x6’ sheet, 45 mil thickness). Tip: Cut to fit the sink’s outer edges for a snug seal!
- ● Drainage components: 1x PVC pipe (1.5” diameter, 12”–18” length).
- ● 1x PVC elbow joint (90° angle).
- ● 1x PVC end cap (to seal the pipe).
- ● 1x PVC slip coupling (for adjustments).
- ● Potting mix (10–20 gallons, depending on sink size). Pro tip: Mix in perlite or sand for extra drainage!
- ● Plants (succulents, herbs, or shallow-rooted veggies like lettuce or strawberries).
- ● Utility knife or box cutter (for cutting rubber liner).
- ● Drill with 1.5” hole saw (for the sink drain).
- ● PVC cutter or hacksaw (for pipe adjustments).
- ● Screwdriver or wrench (for securing fittings).
- ● Measuring tape and pencil (for precision cuts).
- ○ Optional: Staple gun (to secure liner to sink edges).
- ● Sandpaper (to smooth rough edges).
- ● Outdoor paint/sealant (for weatherproofing).
- ● Access to a workbench or flat surface (outdoor space is ideal!).
- ● Basic DIY skills (drilling, cutting, and assembling PVC).
- ● Outdoor location with stable ground (e.g., patio, deck, or garden bed).
- ● Weather-appropriate attire (gloves, safety goggles, and old clothes).
Step-by-step instructions for building a garden sink planter
Transform an old sink into a stylish, functional planter that drains excess water like a dream.
🪴 Step 1: Gather and Prep Your Materials
Start with a clean, food-safe sink—stainless steel or galvanized metal works best. Scrub it thoroughly to remove any residue, then let it dry completely. I like to sand any sharp edges smooth so they won’t cut hands during assembly. If your sink has a drain, keep it intact; if not, you’ll need to drill a 2-inch drainage hole at the lowest point.
For drainage, cut a 4-inch square of landscape fabric to fit over the hole. This keeps soil in while letting water out. Gather your 2 gallons of potting mix and 1 bag of gravel—these will form the drainage layer. Don’t skip the gravel; it prevents clogging and ensures water flows freely.
💧 Step 2: Assemble the Drainage Layer
Place the sink upside down in its final location. Pour the 1 bag of gravel into the bottom, spreading it evenly across the surface. The gravel should cover the entire base, including the drainage hole. Press it down lightly to create a stable foundation—this keeps the soil from washing into the drain.
Next, lay the 4-inch square of landscape fabric over the gravel, pressing the edges firmly against the sink’s sides. The fabric should sit snug but not stretch. This step is critical: if the fabric shifts, soil will escape into the gravel, clogging the drain. Trim any excess fabric hanging over the edges with scissors for a clean finish.
🌱 Step 3: Add Soil and Plant Your Selections
Fill the sink with the 2 gallons of potting mix, mounding it slightly in the center. Press down gently to remove air pockets—this ensures roots can establish quickly. For a 4-planter setup, divide your plants evenly. I recommend 2-3 plants per sink to avoid overcrowding; herbs like basil or thyme thrive in this space.
Dig small holes for each plant, just deep enough to bury the root ball without bending stems. Water lightly after planting to settle the soil around the roots. If you’re using seedlings, avoid disturbing the soil too much—they’ll thank you with faster growth. Place the sink in a spot with 4-6 hours of sunlight for best results.
✂️ Step 4: Maintain and Troubleshoot
Water your garden sink planter when the top inch of soil feels dry. Since it drains efficiently, you won’t need to water as often as traditional pots. I like to use a watering can with a narrow spout to direct moisture to the roots without splashing soil out.
Watch for yellowing leaves—this usually means overwatering. If the drain clogs, disassemble the sink, remove the soil, and flush the gravel with a hose. A monthly check of the drainage hole keeps everything flowing smoothly. With proper care, your garden sink will last for years, giving you a unique, functional planter that’s easy to maintain.
Tips & tricks for perfect garden sink planters
Here's what I've learned from turning old sinks into thriving garden planters—tricks that'll keep your project both functional and beautiful.
Drainage is Everything: That 2-inch drainage hole you drill (or keep) is the secret to success. If you're working with a sink without a drain, use a hole saw bit for clean edges—it makes cleaning clogs much easier later. I also recommend adding a plastic mesh screen over the hole before the gravel layer to prevent soil from escaping while still allowing water flow. This extra step saves you from future headaches when the drain gets clogged.
Material Selection Matters: Not all sinks work equally well. Stainless steel sinks are my top pick—they're durable, rust-resistant, and easy to clean. If you're using galvanized metal, give it an extra scrub with a wire brush to remove any old coating that could leach into your soil. Avoid aluminum sinks, as they can react with acidic soils and harm your plants. For the 4-inch square of landscape fabric, choose a heavy-duty version—it needs to withstand moisture without breaking down over time.
Plant Placement Strategy: When arranging your 2-3 plants per sink in Step 3, think about their mature sizes. Place taller plants toward the back (if your sink has depth) and shorter ones toward the front. I like to group plants with similar water needs together—this makes maintenance easier. For example, basil and thyme make great companions since they both prefer consistent moisture. If you're using a 4-planter setup, consider dedicating one sink to herbs, another to succulents, and so on for variety.
Sunlight and Mobility: The 4-6 hours of sunlight mentioned in Step 3 is ideal for most herbs and vegetables, but remember that your sink planter is portable! If you notice leaves turning pale or plants stretching (a sign of insufficient light), move your planter to a sunnier spot. Conversely, if leaves are crispy or plants wilt quickly, they might need some afternoon shade. The mobility of your sink planter is one of its biggest advantages—don't hesitate to adjust its location as needed throughout the growing season.
Pro Tips for Garden Sink Diy
- Here's what I've learned from turning old sinks into thriving garden planters—tricks that'll keep your project both functional and beautiful.
- Drainage is Everything: That 2-inch drainage hole you drill (or keep) is the secret to success.
- Material Selection Matters: Not all sinks work equally well.
Frequently asked questions
Got questions about your garden sink DIY project? You’re not alone! Here are some of the most common concerns—and their easy fixes—to keep your upcycled planter flowing smoothly.
What’s the best material for the sink basin?
A stainless steel or galvanized steel sink is ideal—durable, rust-resistant, and easy to clean. Avoid aluminum (it can corrode) or thin plastic (may crack under pressure). For a rustic look, repurpose an old farm sink or livestock trough!
How long does it take to build?
Most DIYers finish in 4–8 hours, depending on skill level. Break it into steps: 1–2 hours for prep, 2–3 hours for assembly, and 1 hour for drainage testing. Pro tip: Gather tools first to avoid mid-project delays!
What if my drainage system clogs?
Clogs happen! Use a plumber’s snake or flush with hot water and vinegar (1:1 ratio). For stubborn blockages, disassemble the pipe and clean debris. Protect the outlet with a mesh screen to prevent future buildup.
Can I use this for vegetables or just flowers?
The built-in drainage makes it perfect for herbs, lettuce, or strawberries. Just ensure the soil is well-draining (mix in perlite or sand) and avoid waterlogged plants like impatiens. For veggies, add compost-rich potting mix!
Do I need a professional for the plumbing?
Not necessarily! If you’re connecting to an existing hose bib, basic PVC skills suffice. For underground drainage, consult a local plumber to avoid code violations. Always check your area’s regulations first—safety first!
What if I don’t want a permanent setup?
No problem! Use removable hoses or a detachable spigot for flexibility. For portability, add wheels or a handle to the planter frame. Winterize by draining water and storing indoors if needed.
Wrapping up and next steps
Building your own garden sink DIY planter is a fantastic way to add functionality and charm to your outdoor space—without breaking the bank! 🌱 With just a few upcycled materials and a little creativity, you’ve got a stylish, practical solution for watering plants, rinsing tools, or even enjoying a refreshing drink.
The best part? You’ve just turned trash into treasure while boosting your gardening game.
Now that you’re inspired, roll up your sleeves and get crafting! Start small with one planter, then expand your collection—your garden (and plants) will thank you. Happy building! 🛠️✨