Planting
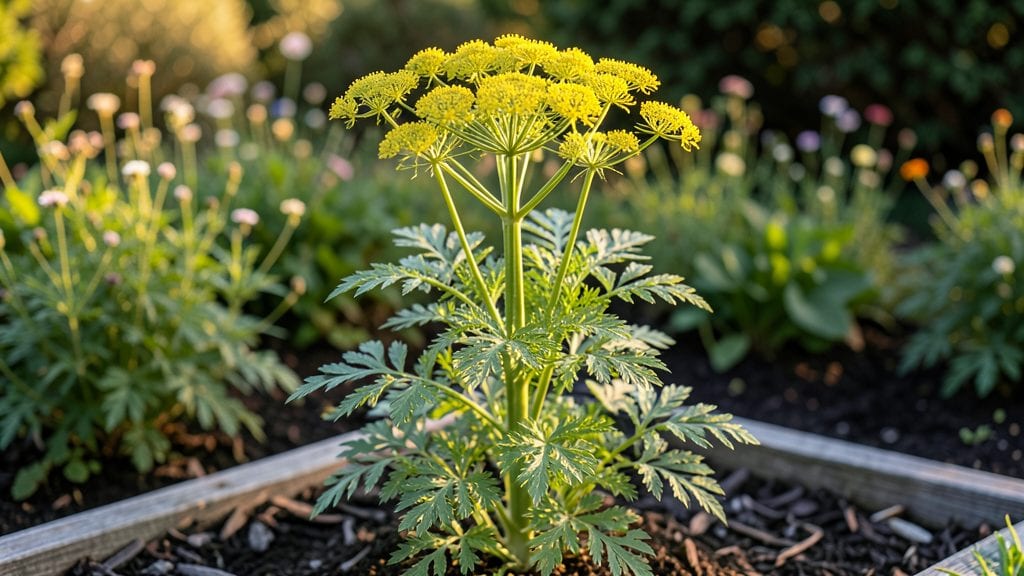
A garden dill plant is one of the fastest ways to get fresh herbs on your table—some varieties sprout in just 3-5 days and reach harvest in under 6 weeks. 🌱 I still remember the first time I planted dill seeds and watched them shoot up like tiny green rockets, completely outpacing my slower-growing basil.
The secret isn’t fancy equipment; it’s timing, sunlight, and avoiding the rookie mistakes that leave plants leggy or bitter.
You’ll need a sunny spot with at least 6-8 hours of light daily, well-draining soil (even sandy spots work), and patience for thin seedlings. Most people overcrowd their dill, leading to weak stems and poor flavor—12-18 inches apart gives plants room to thrive.
For containers, a 5-gallon pot per plant works well, though dill’s taproot means deeper is always better if you can manage it.
By mid-summer, you’ll be snipping feathery fronds for pickles, soups, or garnishes, with plants that keep producing until frost. The flavor? Bright, tangy, and nothing like the wilted store-bought stuff.
And here’s the bonus: dill’s strong scent deters pests like aphids and spider mites, making it a natural bodyguard for neighboring veggies.
Whether you’re growing dill for cooking, companion planting, or just the joy of watching it grow, this herb delivers fast results with minimal fuss. Let’s get those seeds in the ground—or at least in a pot—so you can taste the difference before summer slips away.
📚 In This Guide
- What you need
- Instructions
- Tips and common mistakes
- Wrapping up and next steps
What you need
- ● Dill seeds: 1 packet (about 1,000 seeds) – choose heirloom or organic varieties like 'Bouquet' or 'Fernleaf' for best results.
- ● Growing containers or garden bed: Containers: 5–6 inch deep pots (at least 2–3 per plant) with drainage holes.
- ● Garden bed: Well-draining soil in a sunny spot (6+ hours of sunlight daily).
- ● Potting soil or garden soil: 5–10 lbs of high-quality, well-draining soil (mix in compost for nutrients).
- ● Watering can or hose with a gentle spray nozzle.
- ○ Plant labels (optional but helpful!) – to track varieties if growing multiple types.
- ● Seed starter tray – for indoor germination (great for cooler climates).
- ● Grow lights or sun lamp – if starting seeds indoors before the last frost.
- ● Organic fertilizer (e.g., fish emulsion or compost tea) – to boost growth during the season.
- ● Mulch (straw or shredded leaves) – to retain moisture and suppress weeds.
- ● Pruning shears – for harvesting and shaping the plant.
- ● Glove and hat – to shield from sun and prickly stems when harvesting.
Step-by-Step instructions for growing garden dill from seed
This fast-growing herb thrives in cool weather and delivers feathery fronds in just 6-8 weeks.
🌱 Step 1: Prepare the Planting Site
Choose a sunny spot with at least 6 hours of direct sun daily—dill grows tall and leggy without enough light. Loosen the top 6 inches of soil with a garden fork or tiller to improve drainage, since dill hates soggy roots. Work in a 2-3 inch layer of compost to enrich the soil before planting.
If your soil drains poorly, mix in 1 part perlite or coarse sand per 3 parts soil to create air pockets. Dill prefers slightly alkaline soil, so if yours tests acidic, add a handful of wood ash per planting hole. The ideal pH range is 6.0-7.5—you'll know it's right when the soil smells earthy and crumbles easily between your fingers.
🌱 Step 2: Sow Seeds Directly in Spring
Plant dill seeds ¼ inch deep in rows spaced 12-18 inches apart—they grow quickly and need room to spread. I like to sow seeds 1 inch apart within rows, then thin to 6-8 inches apart when seedlings have 2-3 true leaves. This prevents overcrowding and makes harvesting easier.
Keep the soil consistently moist but not waterlogged during germination, which typically takes 7-14 days. You'll see the first true leaves emerge as bright green, feathery shapes—don't confuse them with the initial seed leaves, which look round and simple. Once seedlings appear, reduce watering slightly to let the soil dry out between waterings.
☀️ Step 3: Provide Consistent Care for Rapid Growth
Dill grows best in cool weather and bolting occurs when temperatures exceed 75°F. If you're in a hot climate, plant in early spring or late summer for a second harvest. Water at the base of plants 1 inch per week, keeping the soil evenly moist but never soggy—yellowing leaves signal overwatering.
Fertilize lightly with a balanced 10-10-10 fertilizer when seedlings reach 4 inches tall. Too much nitrogen produces leafy growth at the expense of flavorful stems. Watch for aphids on new growth—spray with soapy water if you spot clusters of tiny green bugs clustering on stems.
✂️ Step 4: Harvest at Peak Flavor
Start harvesting when stems reach 12-18 inches tall and the first flowers appear. Cut stems just above a set of leaves using clean pruning shears—this encourages bushier growth. You'll see new side shoots form within 1-2 weeks after cutting, signaling the plant is ready for another harvest.
For the best flavor, harvest in the morning after dew has dried but before the sun intensifies. Store fresh dill in the fridge wrapped in a damp paper towel for 1-2 weeks. If you notice the stems becoming woody or the leaves yellowing, it's time to pull the plant and start fresh—dill's flavor peaks when the plant is actively growing.
🌿 Step 5: Prevent Bolting and Encourage Regrowth
To extend the harvest season, pinch off flower buds as soon as they form. This redirects the plant's energy into leaf and stem production instead of seed production. You'll notice the plant stays lush and green longer when you consistently remove flower buds—this is key for a prolonged harvest.
If your dill bolts prematurely, try growing it in partial shade during hot afternoons. The plant will still produce flavorful stems, though the leaves may become slightly bitter. Save seeds from bolted plants for next year's planting—they store well in a cool, dry place for up to 2 years.
Tips & tricks for growing garden dill successfully
Here's what I've learned after growing dill for years—these tricks ensure you get feathery fronds in record time.
Soil Prep Secret: The 2-3 inch layer of compost in Step 1 isn't just about nutrients—it helps retain moisture while preventing compaction. I like to mix in a handful of worm castings too (optional) for extra microbial activity that dill loves. After amending, press the soil lightly—it should hold its shape when squeezed but not feel rock-hard.
Germination Timing: Those 7-14 days for germination can feel like forever, but don't rush it! I place a small stake at each planting spot to mark where I sowed, then check daily for the first feathery leaves. The key is keeping soil consistently moist—not soggy—during this period. A spray bottle works great for gentle watering without disturbing seeds.
Heat Management: Remember that 75°F threshold from Step 3? That's your warning sign for bolting. In hot climates, I grow dill under 30% shade cloth during peak afternoon sun (2-5 PM). You'll still get flavorful stems, just with slightly less leaf production. The good news? This shade trick works equally well for preventing bolting in containers too.
Harvest Hack: When stems reach 12-18 inches in Step 4, here's my pro move: harvest every 1-2 weeks by cutting just above a leaf node. This forces the plant to branch out rather than grow taller. I've had single plants produce enough dill for 4 servings of salmon over 8 weeks using this method. Always harvest in the morning when essential oils are at their peak concentration.
Pro Tips for Garden Dill Plant
- Here's what I've learned after growing dill for years—these tricks ensure you get feathery fronds in record time.
- Soil Prep Secret: The 2-3 inch layer of compost in Step 1 isn't just about nutrients—it helps retain moisture while p...
- Germination Timing: Those 7-14 days for germination can feel like forever, but don't rush it! I place a small stake a...
Frequently asked questions
Got questions about growing your own garden dill plant?
You’re not alone! Here are answers to the most common queries to help you cultivate this fragrant, fast-growing herb like a pro.
How long does it take for dill to grow from seed?
Dill is one of the fastest-growing herbs—expect sprouts in 7–14 days and mature plants ready for harvest in just 45–60 days. For a continuous supply, sow seeds every 2–3 weeks during the growing season. Patience pays off, but the wait is short!
Can dill survive winter or do I need to replant every year?
Dill is an annual herb, meaning it won’t survive winter in most climates. However, if you’re in USDA Zones 8–10, it may self-seed or overwinter in mild conditions. For cooler areas, replant seeds each spring for fresh harvests. Pro tip: Save seeds from your best plants to replant next year!
Why are my dill leaves turning yellow or wilting?
Yellowing leaves or wilting often signal overwatering, pests (like aphids or spider mites), or fungal issues. Check soil moisture—dill prefers well-draining soil and wilts in soggy conditions. For pests, spray with neem oil or introduce beneficial insects like ladybugs. Prevention tip: Space plants 12–18 inches apart for airflow!
Can I use dill from my garden in cooking, or is store-bought better?
Fresh garden dill is far superior to dried or store-bought for flavor and texture. Use leaves in salads, soups, and fish dishes, and seeds for pickling or as a digestive aid. Harvest leaves in the morning for peak flavor, and save seeds by letting some stems flower and dry.
What can I plant with dill to improve growth or deter pests?
Dill thrives alongside companion plants like:
- Cabbage family (broccoli, kale)—repels cabbage moths.
- Cucumbers—dill attracts predatory wasps that eat cucumber beetles.
- Onions or garlic—deters aphids that love dill.
Wrapping up and next steps
Growing your own garden dill plant is a rewarding journey—packed with fresh, fragrant rewards that’ll elevate your cooking and brighten your garden! 🌱 With the right soil, sunlight, and a little patience, you’ll soon enjoy a bountiful harvest of feathery leaves and flavorful seeds.
Whether you’re a beginner or a seasoned gardener, dill’s fast-growing nature makes it the perfect herb to start with.
Ready to take the next step? Plant a few seeds today and watch your kitchen garden thrive! Share your progress with fellow gardeners or experiment with dill in your favorite recipes—bon appétit! 🍽️