
Tools
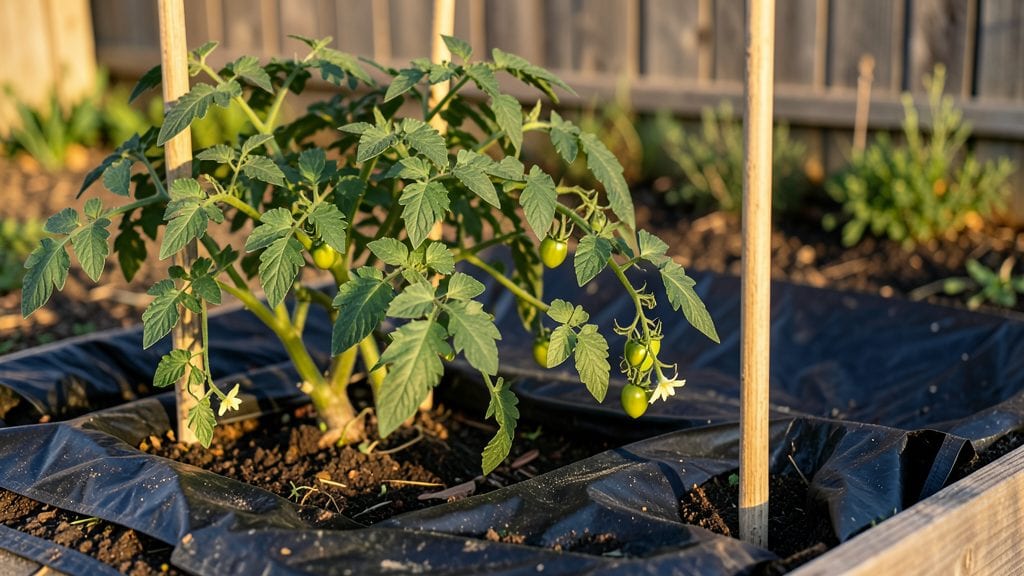
Tarping a garden transforms your soil into a low-maintenance powerhouse—no matter the season. 🌱 I used to spend hours weeding and turning beds before planting, but now a simple tarp does the work for me while I sip coffee in the morning.
The right technique suppresses weeds, warms soil in spring, and even protects winter beds from erosion.
You only need heavy-duty plastic sheeting (4-6 mil thickness), landscape fabric for breathability, and some bricks or stakes to secure edges. Most gardeners overlook proper ventilation—leave the tarp loose in summer to prevent overheating, but weigh down corners in winter to trap heat.
Timing matters too: tarp in early spring to jumpstart planting or in fall to smother weeds before frost.
By midsummer, your beds will be weed-free and ready for direct sowing, with soil that’s warmer and more fertile than untarped areas. The biggest mistake? Leaving tarps on too long in summer—mold and overheating can stress plants.
I’ve seen tarps turn soil into a steam bath, but a few inches of air space prevents that. For winter, a clear tarp lets sunlight through while blocking snow.
Works for vegetable beds, flower gardens, or even compost piles—just adjust the timing. Start with a small section to test your technique, then expand. The payoff? Less work, healthier soil, and a garden that’s always ready for the next crop. Here’s how to do it right from day one.
📚 In This Guide
- What you need
- Instructions
- Tips and common mistakes
- Wrapping up and next steps
What you need
- ● Heavy-duty garden tarp: Size: At least 10–15% larger than your garden bed (e.g., a 10’x12’ tarp for a 9’x10’ bed). Opt for 3–5 mil thickness to withstand wind and UV rays.
- ● Material: Black polyethylene (absorbs sunlight) or clear UV-resistant (allows light for solarization).
- ● Burlap or landscape fabric: A small roll (2’–3’ wide) to anchor edges and prevent soil from poking through.
- ● Stakes or U-shaped ground anchors: Quantity: 4–6 stakes per tarp (or 1 anchor every 3–4 feet for large beds).
- ● Material: Galvanized metal, bamboo, or heavy-duty plastic (avoid wood—it rots).
- ● Rocks, bricks, or cinder blocks: 4–6 heavy objects (5–10 lbs each) to weigh down tarp corners and prevent wind lift.
- ● Utility knife or scissors: For trimming tarp edges neatly.
- ● Measuring tape: To ensure proper tarp sizing and coverage.
- ● Tarp clips or zip ties: Secure edges to stakes without poking holes in the tarp.
- ● Edge weights (e.g., sandbags or water-filled fabric bags): Distribute weight evenly for windy areas.
- ● Reflective mulch film: Place under clear tarps to boost solarization effects in hot climates.
- ● Soil thermometer: Monitor temperature if using tarps for seed stratification or pest control.
- ● Label flags or markers: Track different sections (e.g., "Weed Suppression" vs. "Composting Area").
Step-by-Step guide to tarping your garden for soil protection
Here's how I transform my garden beds into protected, weed-free zones with minimal effort.
🌱 Step 1: Choose the Right Tarping Materials
Use a black plastic tarp (at least 4x6 feet) for weed suppression and soil warming, or a landscape fabric if you need airflow. I prefer 6-mil black plastic because it blocks sunlight completely and smothers weeds effectively. Avoid clear plastic—it traps too much heat and can bake the soil.
Cut the tarp to fit your bed dimensions, leaving 6-12 inches of overhang on all sides. This extra fabric helps secure the edges later. If your bed has irregular shapes, sketch it out first or use a measuring tape to mark the tarp before cutting. Real talk: I once forgot to account for a curved edge and had to patch the tarp mid-season—don’t make that mistake!
🪴 Step 2: Clear the Garden Bed Thoroughly
Remove all plants, rocks, and debris before laying the tarp. Weeds with deep roots or seed heads will regrow right through the plastic. I like to pull weeds by hand (yes, it’s tedious) or use a broadfork to loosen the soil and expose hidden roots. This step ensures your tarp stays effective for the entire season.
Rake the soil smooth to eliminate high spots that could create air pockets under the tarp. If you skip this, you’ll end up with uneven coverage, and weeds might still sprout in the gaps. Think of it like making a bed—smooth and flat for the best results.
☀️ Step 3: Lay and Secure the Tarp Properly
Drape the tarp over the bed, smoothing out wrinkles as you go. Start from one end and work toward the other, pressing edges firmly into the soil. For summer use, leave the tarp loose to allow some airflow and prevent overheating. In fall or spring, tuck the edges tightly to maximize weed suppression.
Secure the tarp with bricks, rocks, or metal edging—whatever you have on hand. I use landscape pins for temporary setups because they’re easy to remove later. Avoid staples or nails; they can tear the plastic when you roll it up. Here’s the thing: if the tarp flutters in the wind, it’ll shift and create gaps where weeds can sneak through.
⏰ Step 4: Monitor and Adjust for Seasonal Needs
Check the tarp every 2-3 weeks during the growing season. Remove it briefly to water the soil if your area experiences dry spells. Black plastic can trap moisture, but it’s not a substitute for regular hydration. You’ll know it’s time to water when the soil feels dry 1-2 inches below the surface.
In winter, leave the tarp on year-round to protect soil from erosion and freeze-thaw cycles. Roll it up and store it if you’re prepping the bed for spring planting. I mark the tarp with a permanent marker (e.g., "Bed A – Spring 2025") so I don’t forget what’s underneath. Trust me, digging up a mystery bed is no fun.
✂️ Step 5: Remove and Transition Back to Planting
Take off the tarp 4-6 weeks before your last frost date to let the soil warm up naturally. Roll it up neatly and store it in a dry place for next season. If you’re reusing it, give it a quick wipe-down with a damp cloth to remove dirt and debris—this keeps it in good shape for years.
Before planting, loosen the soil with a garden fork to aerate it. The tarp may have compacted the top layer, so breaking it up ensures roots can penetrate easily. Here’s where it gets fun: the soil under the tarp is usually richer in organic matter and free of weeds, giving your new plants a head start.
Tips & tricks for perfect garden tarping
A few simple tricks that'll make your garden tarping effortless and effective all season long.
Material Selection: Don't settle for just any tarp—6-mil black plastic is your best bet for complete weed suppression. The thicker gauge prevents tearing from wind or sharp garden tools, and the black color maximizes heat absorption. For beds with delicate plants or seedlings, consider a breathable landscape fabric instead. It allows some airflow while still blocking weeds, especially useful in Step 1 when choosing materials.
Preparation is Key: In Step 2, when clearing your bed, take the extra 10 minutes to remove every last weed root and seed head. I've learned this the hard way after seeing weeds poke through my tarp months later. Use a broadfork to loosen the soil and expose hidden roots—this ensures your tarp stays effective for the entire season. Think of it as giving your soil a deep clean before wrapping it up.
Seasonal Adjustments: The way you secure your tarp in Step 3 depends entirely on the season. For summer, leave those edges loose to prevent overheating—black plastic can get scorching hot under direct sunlight. But in cooler months, tuck those edges tightly to trap warmth and maximize weed suppression. I mark my tarp with a permanent marker to remind myself which season it's being used for.
Long-Term Storage: When rolling up your tarp in Step 5 for storage, take a moment to give it a quick wipe-down with a damp cloth. This removes dirt and debris that can accumulate over the season, keeping your tarp in good condition for years. Store it in a dry place away from direct sunlight—UV rays can degrade plastic over time, making it brittle and less effective next season.
Pro Tips for Tarping A Garden
- A few simple tricks that'll make your garden tarping effortless and effective all season long.
- Material Selection: Don't settle for just any tarp—6-mil black plastic is your best bet for complete weed suppression.
- Preparation is Key: In Step 2, when clearing your bed, take the extra 10 minutes to remove every last weed root and seed head.
Frequently asked questions
Got questions about tarping your garden? Here are some of the most common ones—plus straightforward answers to help you get started with confidence!
When is the best time to tarp a garden?
Tarping works year-round, but timing depends on your goal. For spring/summer weed suppression, apply tarps after planting (or in early spring before weeds sprout). In fall/winter, tarp after the first frost to protect soil and kill pests. Avoid tarping during peak summer heat if your garden is actively growing—let plants breathe!
How long should I leave the tarp on my garden?
Most gardeners tarp for 4–8 weeks, but adjust based on your climate and goals:
- Weed control: 4–6 weeks (check monthly for regrowth).
- Soil warming: 2–4 weeks in spring (remove before planting).
- Winter protection: Leave until early spring (remove 2–4 weeks before planting).
Will tarping kill my garden pests (like grubs or slugs)?
Yes! Tarps suffocate pests trapped underneath, including grubs, slugs, and weeds. For maximum pest control, secure edges tightly and leave tarps on for 6+ weeks in hot/dry conditions. Pair with compost or mulch afterward to break down dead pests naturally.
What’s a cheaper alternative to heavy-duty tarps?
If budget’s tight, try these affordable options:
- Cardboard: Works for short-term weed suppression (2–4 weeks max). Wet it down to weigh it.
- Black plastic sheeting: Cheaper than tarps but less durable (prone to tearing). Use landscape fabric (mesh) for airflow if tarping long-term.
- Old blankets or towels: Lightweight but only good for small patches or frost protection.
Why does my soil smell bad after tarping?
A slightly sour or musty smell is normal—it’s from decomposing weeds and organic matter. If the odor is rotten or foul, your tarp may be trapping too much moisture. Fix it:
- Lift a corner to air out the soil for a day.
- Add coarse sand or straw underneath before re-tarping for better drainage.
- Remove the tarp and fluff the soil before reapplying (if needed).
Wrapping up and next steps
Tarping your garden is a game-changer—it’s simple, budget-friendly, and transforms your soil into a thriving ecosystem year-round! Whether you’re prepping for winter, suppressing weeds, or boosting organic matter, this method saves time and effort while keeping your garden healthy. 🌱
Now that you’re armed with the know-how, roll up those sleeves and give it a try! Start small with a single bed, experiment with different materials, and watch your garden flourish with minimal maintenance. Happy tarping—and even happier gardening! 🎉